• Home
  • About Me
    • Press & Media
    • TV & Local Appearances
  • Blog
    • Baby
    • Beauty
    • Fit Family
    • Fit Travel
    • Free Sample Workouts
    • Lifestyle
    • Nutrition
    • Postpartum Workouts
    • Pregnancy
    • Running
    • Yoga
  • Shop My Looks
  • Nav Social Icons

  • Skip to primary navigation
  • Skip to main content
  • Skip to primary sidebar
  • Home
  • About Me
    • Press & Media
    • TV & Local Appearances
  • Blog
    • Baby
    • Beauty
    • Fit Family
    • Fit Travel
    • Free Sample Workouts
    • Lifestyle
    • Nutrition
    • Postpartum Workouts
    • Pregnancy
    • Running
    • Yoga
  • Shop My Looks
  • Mobile Menu Widgets

    Connect

    Search

Cari Fit

Cari Fit

Fitness Advice, Workout Tips, and Inspiration

Blog

Old-School Bodybuilding Chest Workout – Featured in Oxygen Magazine

I’ve been a little MIA on the blog just due to life and baby #3! However, I did recently work with Oxygen Magazine to create this really great chest workout that I wanted to share (you can view the original here). You can do it just about anywhere and just need a few sets of weights. Be sure to balance out a tough chest workout with a back workout either that same day or a couple of days later. This workout is a little on the advanced side – so just reduce the weights you use or cut out a set or two to make it more beginner friendly. If you have any questions, comment below!

Bodybuilding training is all about finding a good rut. Like clockwork, you want to eat all the same array of muscle-building foods at about the same times each day, and you want to hit your workouts with serious consistency. That said, it doesn’t mean a switch-up isn’t called for now and again to keep your body guessing and adapting.

“The traditional way of thinking when it comes to the order of your exercises within a workout is to start with compound exercises — ones that target multiple muscle groups — and then move on to isolation exercises that hit one specific muscle,” explains Houston-based certified personal trainer and owner of Bombshell Bootcamp, Cari Shoemate. “But you can also get amazing results by flipping that script.”

Take chest, where the usual course of a session is to do presses up front, followed by flye movements later. What happens if you instead do your flyes first? Remember, in a pressing move, your pectorals, anterior (front) delts, and triceps all work together synergistically to lift the weight. But the chest, being the largest and strongest of those three muscles, bears the brunt of the load.

Now imagine what happens when you do flyes first, which focus more wholly on the pecs. They’ll be “pre-fatigued” for the pressing movement — which means they’ll need to step up and work harder during the press to keep pace with the supporting delts and tri’s.

“Reversing the order can more deeply stimulate muscle fibers in your chest as the workout progresses from flyes to presses,” Shoemate says. “You’ll gain more strength and fire up the pecs even better than in the typical bodybuilding-style chest workout.”

To take the following workout one step further, Shoemate also adds a “finishing touch” to the four exercises, making sure you squeeze every last benefit out of each of them. “I’ve found that that the pecs respond well when you play with the pace of the movement,” she says.

The Reverse-Play Bodybuilding Chest Workout

Instructions: Gather two sets of dumbbells (one medium weight and one heavier) and a flat bench. (You can also use towels or a mat and perform the moves on the floor.) After a cardio warm-up of at least 5 minutes to get your muscles activated and blood pumping, you’ll do 3 sets of each exercise listed.

Rest 1 minute between sets and 1-2 minutes between exercises.

EXERCISESETSREPS
Flat Dumbbell Flye38-12
Flat Dumbbell Press38-12
Standing Chest Press38-12
Push-Up312-15

Exercise How-tos

Dumbbell Flye

How-To: Lie faceup on a bench or on a mat on the floor, holding a dumbbell in each hand. Start with your arms extended straight toward the ceiling over your chest, with just a slight bend in the elbows and your palms facing each other. Maintaining the same angle in your elbows, lower the weights out to the sides, getting a deep stretch through your chest as you do so. The elbows should reach a point at or slightly below the level of the bench at the bottom — if doing it on a mat, your upper arms will fully contact the floor. Now, reverse the motion by strongly flexing through your pectorals to bring the dumbbells back up in an arc to the top.

Finishing Touch:On your last set, you’ll manipulate the pace of your reps. For the first half of the set (6 reps), you’ll do a deliberate 4 count (“one one thousand, two one thousand…”) on the way up, then use a two-count to lower the weight, with a one-second pause at the top and bottom.

For the second half of the set, use that 4 count on the downward (negative) portion of each rep with a two-count positive contraction (raising the dumbbells).

Cari’s Tip: “Don’t overarch your back during the movement — simply maintain the natural curve of your spine by keeping your core tight. It helps to plant your feet flat on the floor, or you can bend your knees and place your feet on top of the bench for support.”

Flat Dumbbell Press

How-To: Lie on a bench with your feet flat on the floor, holding a dumbbell in each hand just outside of your shoulders — your arms will be at a 90-degree angle to your torso and your palms will be facing down toward your lower body. Powerfully press the dumbbells upward toward the ceiling, stopping when they come to an inch or so away from each other above your upper-middle chest, then slowly bend your elbows to lower the weights back down to a point even with your chest. (If you’re on the floor, the bottom of the motion is when your upper arms are in full contact with the ground.)

Finishing Touch:On your last set, play with the pace the same way as you did during the flyes: Slow down the upward movement using a four-count for half of the reps and then reverse it so you slow down the pace on the downward movement during the second half of the set. Be sure to pause at the top and squeeze as if you’re trying to hug a large ball or barrel atop your chest.

Cari’s Tip: “If you’re really challenging yourself with heavy weight, you may want to ask a friend to spot you — although in that case it’s better done on a bench than the floor. They can do so by supporting you with their hands under your elbows or by holding your wrists to assist.”

Standing Chest Press

How-To: Stand holding one dumbbell directly in front of your chest by placing one hand on each end and pressing together, your elbows bent, lifted up and pointed out to each side. Your feet should be under your hips, your core engaged, and your hips tucked under slightly so you aren’t arching your back. As you exhale, press the dumbbell straight out in front of you by extending your arms (but don’t lock them out at the end). At full extension, pause for a slow two-count, then slowly bring the weight back to your chest.

Finishing Touch:On your last set, increase the challenge by pausing your hold at the end and counting for 5-10 seconds before returning to the start position.

Cari’s Tip: “If you feel your back arching or pulling, the weight is too heavy. This move should be uncomfortable, but you shouldn’t be straining to maintain your upright position during it.”

Push-Up

How-To: Assume a high plank position, your feet together, balanced on your toes, your hands placed wider than shoulder-width and flat on the floor and your elbows extended. Keeping your head neutral and abs tight, inhale as lower yourself by bending your arms until your elbows are at a level parallel with your shoulders — you don’t have to bring your chest all the way to the floor — then exhale as you press through your palms until your arms are straight once again.

Finishing Touch:During the first half of your last set, lower yourself to the floor in four steps — go down a few inches, pause, go down a few more, pause, etc. — until you get to the bottom of your push-up, elbows level with your shoulders. Then, as you exhale, press yourself back up as normal. Reverse the pattern for the second half of the set, rising with the four-step method and then lowering yourself in one smooth motion.

Cari’s Tip: “If it’s too difficult and your form is suffering, it’s ok to drop your knees to the floor. Don’t get discouraged if you can’t complete the full set! In my experience as a trainer, I’ve seen my clients progress easily with push-ups even when they think they can’t. Someone who could only do 5 can suddenly do 30 after a week or so, and that builds confidence.”

Family Travel Review – Margaritaville Lake Conroe

My family and I just got back from a super fun staycation at the Margaritaville Resort at Lake Conroe, TX. It’s perfect for families in the Houston area that want a tropical resort vibe, but don’t want the hassle of flying somewhere or taking a long roadtrip with little kids. Don’t let the name fool you….this place isn’t just for grown-ups! There are a ton of things to do with kids of all ages and could even be a romantic getaway for a couple. Scroll down to snag my coupon code for a discount! Here is what we loved about this resort…

Accommodations

Lakeside Cottage With Loft
Cottage Bathroom

We stayed in one of the lakeside cottages which are super cute and very spacious. We had a loft cottage, so our 2 older kids each had a bed (and tv) of their own. When you first walk in, you are in the living room which has a sleeper sofa, tv, desk and plenty of room for a large family to relax. There is a small kitchenette in the middle that has a full sized refrigerator/freezer, sink, coffee maker (with coffee pods and bottles of water). The large bathroom is in the hallway with 2 sinks (with cute fishtail faucets!), a large shower and lots of storage and counter space. The main bedroom is in the back with a king bed, night tables and a large closet. The decor was amazing. I seriously felt like I was at a tropical resort in the Bahamas. If you want something more in the center of the action – you may want to get a room (or one of the large suites) in the main hotel building. They also have the cute tropical decor and many rooms have balconies.

Food

Eggwhite Skillet at License To Chill

There were two main restaurants open when we went (the others are closed for the season). License To Chill Bar and Cafe and the Landshark Bar and Grill. License to Chill is located in the main hotel building and has indoor seating and lots of great patio seating overlooking one of the pools. The food was really great – we ate breakfast here both mornings and my kids said the pancakes here are the best! I opted for a egg-white and veggie skillet which was healthier and super tasty! They had a lot of other great options too. One night we had dinner to-go and sat outside to eat by the fire-pits. The ahi tuna salad was amazing! They have a kids menu too with lots of options. Landshark Bar and Grill is adjacent to the pool area and is a free-standing large restaurant with outdoor seating overlooking the lake and beach, as well as an indoor restaurant (and gift shop) and bar. We got lunch to-go here one day and ate by the pool. They have a kids menu and tons of unique salads, burgers and sandwiches….oh and of course margaritas! For dinner, we sat outside near the fire-pit and the kids played at the enclosed beach area (there are also palapas and outdoor chairs in the sand). Our fish tacos were great and they have a really good key lime pie if you want to indulge!

Kid-Friendly Pancakes at License To Chill
Ahi Tuna Salad Fireside

Pools

Family Pool With Slides

The pools here are probably the main attraction. They have a large resort pool with infinity edge (chilling out here with a margarita at sunset is a must) and hot tub. The kids area is a little seperate, which is nice if you are on an adult trip. There is a huge kids/resort pool that has water slides, large stair entry and is heated, which we really enjoyed. Next to the kids area is a toddler pool/splash pad that has a cool pirate ship with slides and activities for the younger age (probably under 10) and zero entry pool for toddlers. As if that wasn’t enough – there is also a lazy river with tubes!

Health/Fitness/Spa

St. Somewhere Spa

I love a good fitness center when I travel. However, during Covid I’ve kinda steered away, especially if it’s crowded. Well, the fitness center here is HUGE (it’s in its own building) with plenty of room to space out. The cardio equipment is in one room and strength training in another. Prefer to take a morning yoga class or group fitness class? They have that too! They have pilates room (with reformers), spin studio room and group fitness room and offer classes daily (check the resort’s schedule). The St. Somewhere Spa is also in its own building and is very spacious. The relaxation room is just that…very relaxing with water, teas and other treats you can enjoy before/after your treatment. I opted for the signature massage which was wonderful. The property is spread out, so if you like to run or walk, you can create some cool routes along the water and docks. There is also mini golf which is fun for the whole family – or if you are into “real” golf, there is a course nearby.

Fitness Center

Other Amenities We Loved

  • Grab and go food at Joe Merchant is great and they have a nice mix of healthy snacks, breakfast sandwiches made daily, pizzas and even Starbucks.
  • The lake! If you have time, you can rent a boat onsite and take your family out for a cruise! They also have a selection of kayaks and other water sports rentals. Being on the water definitely helps give the place a more tropical vacay vibe.
  • I also just really loved the decor! The entire resort is filled with nautical and tropical decor and furniture and you can tell a lot of thought went into every little detail.
  • The landscaping is also super pretty with all the mature palm trees and plants.
Grab-And-Go Snacks at Joe Merchant

Tips

  • You may want to pack a stroller if you get a cottage that is farther away from the resort.
  • If the weather is bad, you can order food to-go from one of the restaurants and eat in your cottage or even order Door Dash or delivery.
  • Landshark Bar and Grill has a great fire-pit and they used to do s’mores. You may want to bring your own as back-up and they will let you make them yourselves.
  • There isn’t a baby changing station in the lobby bathroom, but if you go upstairs next to the arcade – the restrooms there have one.
  • They play music nonstop out by the pools and Landshark Bar and Grill. It’s a great mix and keeps the vacay vibes going, but sometimes it can be a bit loud. If you don’t want to hear it from your cottage – I suggest getting a cottage with a higher number so that you are farther away. I actually called the front desk and asked them politely if they would turn the music down one day and they did it immediately and were so nice.
Lots Cute Seating Areas With Tropical Vibes

Ready to Book? Use my promo code CARIFIT15 to get 15% off!

Weighted HIIT Workout Featured in Oxygen Magazine

HIIT your body from head to toe in 40 minutes with this minimal-equipment, maximum-results workout.


High-intensity interval training — HIIT for short — isn’t just a cardio phenomenon.
This training style, which intersperses high-velocity all-out bouts of activity with short rest
periods, has been shown to improve fat burning and aerobic fitness in a more efficient
manner than typical long-form steady state cardio. But this form of training can also be
super effective with weight workouts as well, upping the calorie burn and turning up the
intensity.


With that in mind, the following 40-minute full-body HIIT workout with weights —
courtesy of Houston-based certified personal trainer and owner of Bombshell Bootcamp
Cari Shoemate (cari-fit.com) — is perfect for anyone looking to shed some pounds while
shaking up their typical resistance-based routines.


To do it, you’ll only need one barbell and 2-4 weight plates — which can mean anywhere
from 10-pound plates to the traditional 45 pounders, depending on your strength and
fitness levels. Just be aware that a full-body HIIT workout with weights like this is tough
and geared toward experienced lifters who have been resistance training steadily for at
least six months.


“You’ll want to warm up for five minutes before you start the first of the four HIIT ‘blocks,’”
Shoemate explains, adding that the warmup can consist of, say, jogging on the treadmill, or
a lower-intensity ride on the elliptical, or jumping rope and calisthenics.
As for those four “blocks,” they are simply 10-minute segments of time, according to
Shoemate. Within each block are 30-second to 60-second periods of medium-to-high-
intensity work broken up with one-minute rest periods. You’ll finish with a five-minute
cooldown, which can be a walk on the treadmill, a selection of yoga poses, or a slow-paced
pedal on the stationary bike.

“I love this session, as well, because it will make you think outside the box when it comes to your workout equipment”, Shoemate adds. “There are so many great muscle-building exercises that can be done with just a barbell and plates, and it’s fun to get creative.”

Side-to-Side Tuck Jumps
Place the barbell on the floor without weights and stand alongside it in athletic “ready
position” — elbows bent, both hands out in front of you, core tight, and knees slightly bent
with roughly a shoulder-width stance. Keeping your chest up and back flat, squat down and
then explode upward as high as possible and to the side, bringing your knees toward your
chest as you quickly reach your hands around them, then open back up as you land on soft
knees on the other side of the barbell. Repeat immediately by jumping back over the bar to
the start.


Standing Shoulder Press
Clean the bar to shoulder level, holding it with an overhand grip just outside shoulder
width, palms up and elbows pointed forward, your upper arms near parallel with the floor
as the bar rests atop your upper chest. Your feet should be set directly under your hips,
toes angled slightly out. From this position, explosively drive the bar overhead to full elbow
extension, hold it there for a one count, then lower it until it touches back down to your
upper chest.


Upright Row
With your feet shoulder-width apart, stand holding a barbell in front of your thighs with a
wide, overhand grip. Maintain a slight bend in your knees, with abs tight and eyes focused
forward. From here, flex your deltoids to pull the barbell up toward your chin while
keeping the bar as close to your body as you can, letting your elbows bend and rise toward
the ceiling — they will finish above the level of the bar at the top. Hold the top for a second
before slowly lowering the bar to the start position.


Kneeling Single-Arm Shoulder Press
To start, assume a half-kneeling position, left knee down, right leg out behind you with that
knee elevated slightly off the floor. Hold the center of the barbell at shoulder level in your
left hand, elbow bent — focus on balancing it so it stays parallel to the floor. From here,
press it upward to full elbow extension (without locking out) for 30 seconds, then switch to
a right-knee-down stance and complete 30 seconds with the right arm. Keep your core tight
and torso upright throughout.

Landmine Reverse Lunge into One-Arm Press
Place one end of the barbell, unweighted, into a corner or against the bottom of a wall. Load
the appropriate amount of weight on the other side and stand facing the bar, holding the
end of the weighted side of it in your right hand at shoulder level. Step back with your right
leg into a reverse lunge, descending to a point your left thigh is parallel to the floor and
your right knee is just above the floor (it should not touch down). From here, return to
standing as you extend your right arm to lift the bar overhead to full extension. Pause for a
moment at the top, then step back again with your right hand as you bring the end of the
barbell back down to shoulder level. Repeat for reps on the right; later in the workout,
you’ll do reps with the left arm and leg.


Landmine Squat
Keeping the barbell tucked in landmine position against a corner or bottom of a wall, face
the loaded end with a stance slightly wider than shoulder width, holding the ends of the bar
securely with both hands at your upper chest. Your core should be tight, back straight and
knees slightly bent. Lower yourself into a full squat, thighs parallel to the floor, your hands
remaining in place at your chest, then return to standing by powerfully extending the hips
and knees.

Fast Toe Taps on Bar

Stand facing an unweighted bar on the floor — you should be at the center of the bar in athletic ready position. From here, you’ll quickly alternate bringing one foot up to tap the top of the bar while the other foot goes back to the floor, generating a smooth and fast rhythm that feels like a standing-in-place sprint.

Alternating Side Lunge with Knee-Up

From a standing position, take a long step out to one side, bending that knee to lower your torso and hips toward the floor. Your trailing knee will be extended, with that foot remaining in contact with the floor. At the bottom, return to a standing position by driving through your heel and straightening your knee, continuing the motion to bring the trailing leg into a full high knee-up. Lower that foot to the floor, then step out to the opposite side to repeat the sequence.

Stiff-Legged Deadlift

Stand upright, feet shoulder-width apart and a slight bend in your knees, holding a barbell in front of your upper thighs with an overhand grip. Keeping your chest up and core tight, lean forward from your hips, pushing them rearward until your torso is roughly parallel to the floor. As you lean forward, keep your arms straight and slide the bar down your thighs toward the floor until it reaches your shins. At the bottom, keep your back flat, head neutral with the bar very close to your legs. Flex your hamstrings and glutes and lift your torso while pushing your hips forward until you bring the bar back to the start position.

In-and-Out Squat and Step

Stand with your feet in a narrow stance inside shoulder width, holding a bar across your upper back. Your knees should be slightly bent and your toes turned out a few degrees. Keeping your head in a neutral position, abs tight and torso upright, bend at the knees and hips to slowly lower your glutes toward the floor until your thighs reach a point parallel to the floor. Return to standing by powerfully driving up through your heels, extending at your hips and knees. For the next rep, step out with the right foot to a point your feet are shoulder-width or slightly wider, and perform another squat. For the third rep, step back into the narrow stance, and for the fourth, step out with your left foot to assume a shoulder-width or slightly wider stance. Continue the pattern for 30 seconds.

Traveling Burpees
Stand upright with your feet shoulder-width apart, facing a barbell set longway in front of
you on the floor. Start by squatting down as you put your hands out in front of you, then
kicking your legs out behind you as your hands reach the floor. From this position, you’ll
lower yourself to the floor for a full push-up, then quickly press yourself back up with your
arms while pulling your feet in underneath you again. Extend at the hips and knees to
return to standing, continuing through with your hands overhead into a jump to propel
yourself over the bar. When you come back down, immediately turn around and descend
into the next rep.

Overhead Triceps Extension (with plate)
Stand holding a plate in both hands behind your head, elbows fully bent. Keeping your head
straight and lower back tight, extend your elbows until your arms are straight and the
weight is directly overhead. Squeeze the triceps for a one count, then slowly lower the plate
back behind your head.


Standing Biceps Curl (with plate)
Stand holding a plate in both hands, arms extended and at your sides so the weight is in
front of your hips. Maintaining tight abs and an upright posture, contract your biceps to
curl the plate toward your chest, keeping your elbows at your sides throughout. Hold and
squeeze the biceps at the top, then slowly return the weight along the same path.

My Favorite High-Protein Snacks

Happy 2022! It’s been awhile since I’ve done a post. Now with 3 little kids – fitting in workouts and eating healthy has been more of a challenge! But, I feel like I’m finally headed back in the right direction. I will do a post on my weight loss journey soon – but for now I wanted to share what has been working for me so far.

Over the summer I got down to (almost) my goal weight and built more muscle mass. However, I did gain some of that back over the holidays. What I’ve found to be the best strategy for me as a busy mom of kids 8, 5 and 1 is to simplify my workouts (but use heavy weight) and eat a high-protein diet. I will share more some of my workouts soon, including one I just did for Oxygen Magazine. I try to eat about 1g of protein per 1lb of body weight (goal weight not when overweight), so I’m always looking for ways to sneak in extra protein throughout the day.

Why so much protein? Protein fills you up faster and also helps you gain (or keep) lean muscle mass. So, if you plan to up your protein intake – it’s really key to make sure you are doing some sort of strength training (even body weight) during the day so that all that protein can do its job!

Here are my latest favorites (*these my kids like too!):

Ratio Yogurt*: I found this yogurt at my local HEB and it has 25g of protein per serving. It’s actually really tasty without any artificial sweetener taste and the texture is creamy and amazing. I love all the flavors, especially the key lime pie!

Hardboiled Eggs*: This is a super simple one. To save time, sometimes I buy them pre-made or get the little Vital Kitchens pack with seasonings. However, my Dad just gave me this cool egg cooker for Christmas and it makes hardboiled eggs really quickly and easily!

Protein muffin cup: I have tried a few different brands. The FlapJacked one has more protein but is not quite as flavorful as the Kodiak Cakes one.

Barilla Pasta*: This isn’t really a snack – but whenever I make pasta at home for the fam, I use this brand. I will never go back to regular pasta.

Magic Spoon Cereal*: I recently found this and love it. My kids actually really like it too! I got a whole variety pack and my kids ate most of them! The cereals are all super tasty and the best part is that they have less sugar and more protein than similar kids’ cereals. I love the bright colors and cute packaging too!

Whole Foods Protein Bites* I found these at Whole Foods and are a great snack for on-the-go.

Pure Protein Shakes: This has been my go-to shake recently. I get a whole case at Costco. The taste is good and it has low sugar and high protein.

Egg Life Wrap These are at Whole Foods, HEB, Aldi and other grocery stores. They are a great substitute for tortillas or other wrap for sandwiches, snacks and even breakfast burritos.

Shop my outfit HERE

All opinions above are my own, although I have partnered with Magic Spoon Cereal.

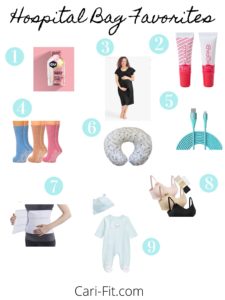
Hospital Bag Must-Haves; What You Do And Don’t Need For Labor & Delivery

This is another baby related post – but bear with me…the fitness content will be coming soon : ) But, I wanted to share with you guys what I packed in my hospital bag this time around and what I wished I had brought. Since this was baby #3 for me – I already had an idea of what I would need and want but found a few new things that were helpful!

Hospital Bag Must-Haves

First of all, the hospital really does provide you everything you need. However, some of their items are great and some not the best. I think it depends on the hospital too. For my 3rd baby I delivered at Memorial Hermann here in Houston and they were great. They provide you the gown, disposable underwear, pads, band, socks and even a water bottle (I brought mine home and still use it!). But, you may want to pack your own as backups. Here is what I brought:

  • Hospital Bag. I brought a large purse and then this cute bag that’s from Calia by Carrie Underwood and it worked great since it had tons of storage and internal pockets to separate my stuff and baby stuff.
Calia by Carrie Underwood Bag
  • Snacks. Depending on what hospital you go to and your doctor – you may be allowed to eat a little during labor. During my first 2 labors/births they didn’t want me to eat anything but allowed me to have a couple of popsicles. The hospital usually provides these. This time around I even packed a gatorade (to keep me extra hydrated) and some energy gels (the ones I used to use for marathon training). You need to check with your doctor first before eating/drinking anything in case it causes problems with your labor and delivery process. I also packed a few snacks for my husband like protein bars, nuts, etc that he could eat if we were stuck in the room for a long time like with our other 2!
  • Hospital Gown. The ones the hospital gives you aren’t the best, but honestly once you are in labor you probably won’t care! I bought this kit from Frida Mama and brought it with me to the hospital. I didn’t really end up using most of it since it was geared towards vaginal delivery (with cooling pads, etc) and I had a c-section. I did love the soft hospital gown but it was waaaay too big (and I was not small by any means!). I have some nursing tanks and tees from this site and they also make gowns that look comfy.
  • Disposable Underwear. The hospital provides these for you too and I preferred these over the ones that came in the Frida kit that stuck to my skin.
  • Pads. Hospital provides but they are super huge. I used those for the first couple of days in the hospital and then switched to some slightly smaller ones.
  • Belly Band. There are a ton of these out there right now but I honestly preferred the one that they gave me at the hospital (your insurance will most likely cover it too). You don’t want a hard and constricting band. A softer, stretchy one is the best – especially if you have a c-section. I had to sit in a wheelchair every 2-3 hours to go to the nicu to feed my baby and I needed something that made me feel like I had support but that also didn’t cut off my circulation or make me uncomfortable while sitting. Here is a similar one that I ended up buying a few weeks later once the hospital one got too big.
  • Socks. You can use the ones at the hospital or buy your own. I like ones with little grippers on them. Also, you want to get ones that are a little on the big side because most likely your feet and legs will swell (especially if you have a c-section).
  • Water Bottle. I actually loved the one the hospital provided and as tacky as it was – I brought it home and still use it! It’s big and has a handle and a straw. If you have a favorite one from home you could bring that.
  • Phone Charger. Bring an extra long one that will reach the hospital bed.
  • Pack a small makeup bag with a small brush, hair tie, any makeup you want for photos and toothbrush. , Lip moisturizer is a must-have. My lips get so dry in the hospital! I love this coconut balm by Kopari.
  • Nursing Bras. Pack soft ones like these that are easy to use. I liked having the support (and some privacy) under my gown. If you plan to nurse and/or pump – it’s helpful to use the hospital’s pump during the first few days to help your milk “come in” faster. Some women bring their own pumps but I just used the hospital’s one since it’s a nice one. Don’t be afraid to take advantage of the lactation consultant either!
  • Going home outfit for baby. If there is a certain pacifier you want bring that – but I actually prefer the “soothies” ones that they provide at the hospital and all 3 of my babies did too! I also just brought mine home in the cute little hospital hat and t-shirt since they looked so comfy and I knew there would be plenty of time to dress them up later but they probably wouldn’t be wearing their hospital gear again : (
  • Going home outfit for you + shoes for swollen feet. I can’t stress this enough – you will not be as small as you think you’ll be! Most likely you will be about the same size going out as you were going in (due to swelling, etc). I made the mistake of bringing cute new pants, bra and shirt with me to wear after I had my first baby and NOTHING FIT! I was so sad. I ended up wearing the baggy shirt that I wore to the hospital days before. You also want to make sure your pants and underwear fit way above your naval in case you have a c-section. Tennis shoes, boots or anything constraining are also a big no-no. Stick with slip-on shoes that allow for swollen feet.
  • Nursing Pillow (optional). I forgot my Boppy but just used some extra hospital pillows to support my arms and baby while breastfeeding.
1) Energy gel 2) Kopari lip balm 3) Hospital gown 4) Gripper socks 5) Long charger 6) Boppy 7) Belly Band 8) Nursing Bra 9) Going home outfit for baby

My Birth Story, Plus Tips on Recovering From A C-Section

I’m excited to share that I just welcomed baby #3 into the world about 2 months ago and couldn’t be more in love!

I wanted to share a little bit of my birth story and about having a c-section since I’ve had some requests to share and it’s relevant to my blog (health/fitness). Scroll to the bottom for my Q&A. For those of you who aren’t interested in baby topics – I ask you to just be patient with me because the next few posts may center around that since that’s what is going on in my life and also driving my current fitness routine. I plan to start sharing details of my postpartum workouts once I start working out. Even if you haven’t had a baby – I think they could still be useful.

Overall, my pregnancy this time was similar to my first 2 pregnancies – except that I started out 10lb heavier. During the first and second trimesters, I was still working out at the gym 3x per week doing a mix of cardio (usually 30min of treadmill walking with inclines or boxing intervals) and strength training for about 1 to 1.5 hours each time. For strength training I spent extra focus on my back, glutes and legs to avoid having back pain. I did a lot of deadlifts, seated leg extensions, squats (first trimester) and walking lunges. But, when we got hit with coronavirus – I started a walking routine at home. I tried to go for a walk almost every night for 30-45minutes in my neighborhood and I felt it kept my sanity and I think is helping me recover better. I only did a little strength training in my 3rd trimester and mainly just did walks.

Although I had to have 2 prior c-sections (not by choice) I switched doctors and found one that was willing to let me try for a VBAC this time. I did a lot of research and thought I would still be a good candidate for VBAC despite having 2 prior c-sections and my doctor agreed (see FAQ below). I was nervous to have a 3rd c-section since it’s a major surgery and many things can go wrong. However, they can also go wrong with a VBAC like the slight chance of uterine rupture or other complications. After discussing it with my doctor – we planned on VBAC the entire pregnancy. I only gained about 20lb up until the end when I started getting really big and then gained over 10lb of just fluid! At most of my ultrasound appointments they kept telling me this was a “big baby” but I know that isn’t always the case and not a reason to panic or think you can not have a regular or VBAC delivery. But, as the weeks went on and I got closer to my due date they kept saying my baby was measuring really big and he was 10.3lbs at only 34 weeks! I didn’t have gestational diabetes (a reason why many babies are large) or any other complications. However, near 37 weeks my ultrasound showed that my amniotic fluid levels had increased tremendously and I was at risk for many complications because of this. It’s a condition called polyhydramnios and can cause many problems for mom and baby including placenta separation, bleeding, cord prolapse and many others. The ultrasound doctor explained to me during my visit that at that point (37 weeks) it would actually be less risky to have a c-section and to do it soon, rather than to wait and go into labor on my own. She told me to pack my hospital bags when I went to see my obgyn the next day for my 37 week checkup because she had a feeling my doctor would admit me that day to the hospital. So, Sure enough – my doctor said that is what she recommended. She said it wasn’t safe for me and the baby and she recommended we do a c-section immediately that day. Luckily I had my hospital bag packed and my husband met me in the lobby and we went to the adjacent hospital to check in.

With my first 2 babies – I went into labor on my own and was in labor at the hospital for a very long time (almost 40 hours with my daughter!) and then ultimately had to surrender to c-sections with both. So, for this one pregnancy it was actually less stressful because I wasn’t in pain from labor and my doctor and nurses didn’t have to rush as much to get me ready since it was less of an emergency. I also didn’t have an epidural this time – but a spinal block. Apparently the difference between epidural and spinal block is that the epidural lasts longer but with the spinal block you feel less during the surgery. That was true for me and that made me a lot happier because with the first 2 I felt a lot of the tugging, pulling and what felt like more of the surgery. I never had pain but just felt more of what they were doing when I had an epidural. With the spinal block I didn’t even realize they had started the surgery and then all of a sudden I heard my baby cry! I could’t believe they had already taken him out! I did feel tugging and my body moving back and forth more after he was out when they were finishing the procedure, but it was not painful or uncomfortable at all. So, if I had to have the choice again I would definitely do the spinal block. They both are inserted via catheter into your spine and felt the same way being inserted (you are numbed first). I was still very nervous to have the c-section and not being able to feel my legs gave me anxiety. Luckily the OR nurses were great (thanks Lorena!) and my husband was there to hold my hand. I just kept trying to focus on the baby and breathe to calm my nerves. I did get nauseous and they were able to give me something in my IV and also one of the nurses used an alcohol swab/pad under my nose and it helped a lot – with the nausea and anxiety!

After my baby was born I didn’t get to hold him right away like I had wanted because he had a minor breathing issue due to all the fluid and also since he was born at 37 weeks. Technically that’s full-term but now research shows that it’s better for babies to stay in the womb until 39 weeks if possible. After they got his breathing stabilized they brought him over to me and I was so overwhelmed with emotion! He was the cutest, chubbiest newborn I had ever seen with cute chubby cheeks! I was so happy but also super sad because I knew he was struggling – so I was ok with them taking him to the NICU for observation.

I ended up staying in the hospital 4 nights and I was recovering just fine. The 3rd day was the worst for me but it was for my other 2 c-sections too. It’s when the pain meds start wearing off and you become more active getting up to us the bathroom (no catheter anymore) and holding/feeding your baby. My baby had to stay in the NICU the whole time to monitor his breathing and his blood glucose since it was a little low (it’s common with large babies). So, I had to be wheeled down to the NICU every 3 hours to feed him. I knew I wanted to breastfeed since I did it with my other 2 and was happy he was able to do that. On the 5th day we were both discharged and I was able to bring my healthy baby boy home!

Recovery at home was surprisingly about the same as it was with my other 2, if not slightly better. I think all the walking I did during my pregnancy really helped. Getting in and out of bed was really hard (as was sitting/standing) for the first week. But, overall I wouldn’t say that having a 3rd c-section was any harder or painful that the others. This could also be because I knew what to expect. It was hard not being able to play with my other children – but I knew this was just temporary and I reminded myself not to overdo it or my recovery would take even longer. I had tons of swelling (maybe more this time) in my legs, ankles and feet. It’s normal though and lasts about 2 weeks until your body can gradually get rid of it. It affected my blood pressure though and I actually had to get on medication for about 2 weeks because it was dangerously high at one point. Although I didn’t have it – it’s possible to have postpartum preeclampsia. So, if you think your blood pressure is high or you have any symptoms (headaches, blurred vision, breathing rapidly, etc) check with your doctor right away.

Here are a few FAQ’s I’ve received from DM’s and social media:

Was it hard being pregnant during COVID-19/Coronavirus?

Yes, mainly because I couldn’t take my other 2 kids out to do things and they weren’t in school – which means I got less time to myself. I also wasn’t able to take my husband or kids to any doctor appointments or ultrasound appointment which I wanted to do. This was my 3rd baby – so I wasn’t planning to have a baby shower but feel bad for those expecting mamas that had to miss out on that. But, I am going to plan a virtual “Sip and See” party with friends!

What was your hospital experience like during the pandemic?

Things were a lot more strict. First of all they check your temp and ask you questions before you even go to the labor and delivery department. Once I was admitted they actually tested me for coronavirus which was not fun but I’m glad they did. I was only allowed to have 1 guest with me the whole time (my husband) and no children were allowed at all. If my husband wanted to leave he had to wait until the next day to return. He was allowed to be in the OR with me during delivery thank goodness. I had to wear a mask most of the time I was in the hospital except when we were alone in our room and also during the c-section since I had an oxygen tube under my nose. All of the doctors and nurses wore masks all of the time, as did the other hospital employees.

Is having a third c-section harder than the first or second?

In my experience it was not (see above for details). I was really scared the surgery would be harder or something would go wrong since I figured I had more scare tissue, etc (which my DR said I did) but it still went smoothly. I felt the recovery was about the same as the other 2 as well.

Is it riskier to have a third c-section? Should I try to have a VBAC?

I would talk to your doctor about this because I think it depends on your situation and your body. From what I had researched – it seemed like having a 3rd c-section was more risky than vbac and that’s why I tried really hard to find a good doctor that was open to me trying a vbac or at least “trial of labor after cesarian” (TOLAC). However, when I found out I had polyhydramnios it became more risky for me to do vbac since that would require for me to go into labor on my own (they can’t induce you after you’ve had a c-section). So, ultimately the 3rd c-section was less risky for me but may not be for everyone.

What can I do to recover faster from a c-section?

I would start with what you do during pregnancy. I would try to eat as healthy as you can, only gain the recommended weight and exercise if your doctor says you can. Don’t overdo workouts though. Just focus on your cardiovascular health and any areas you feel are weak. For me, that was my lower back, glutes and hamstrings. Then, after your surgery try to walk (slowly) as soon as your doctor tells you to. I also wore my belly binder that the hospital gave me and that helped a ton. If they don’t give you one you can buy one ahead of time on Amazon like this one or this one (I have both). I tried a bunch of them and they were either too tight, too stiff to sit down in or they rubbed me the wrong way. You can also wear them over your clothes/underwear if your skin is sensitive.

Did you do any core workouts while pregnant? Did they help with diastasis recti?

I did minimal core work with my first 2 pregnancies and never had diastasis recti (separation of abdominal muscles). This time around I wanted to focus on it a little more. However, what I found out was that more core work was actually starting to cause “coning” in my abdomen. What’s “coning”? It’s when you can notice a cone shape in your ab muscles when you sit or move a certain way that engages them. This can lead to DR (diastasis recti). So, I stopped doing exercises that I felt were making it worse. I know many people recommend planks during pregnancy but I felt they were making this “coning” show up even more. So, I stopped doing them. I also stopped doing the Smith Machine (weighted squats with the bar) because my core was contracting outward sometimes when I was doing the squats. So, instead I just focused on contracting my abdominal muscles for 20 seconds at a time when I did my nightly walks.

Comment below or send me a DM on Instagram (@carifit) if you have any questions for me!

At-Home Booty Workout – Regular + Prenatal

A couple of weeks ago I did a live booty/glutes workout with my friend Megan on Instagram. We wanted to share some of our favorite booty exercises that you can do at home without equipment. Since I’m pregnant – I showed how you can modify all of the exercises for pregnancy or just to take them down a notch. Below is the 10-minute workout you can do at home! *If you are pregnant – please check with your doctor before doing this or any workout.

10-Minute At-Home Booty Workout (pregnancy friendly)

Go through all of these exercises once, then if you have more time, repeat the whole circuit 1-2 times! If you want to make it harder, hold 1-2 weights or grab something heavy around your house like a water jug, etc.

1 Minute Each:

  • Walking Lunges (alternate legs) or you can do reverse lunges if you don’t have enough room to walk. PREGNANCY TIP: go slower
  • Plie Squats (point toes out slightly)
  • 3 Low Squat Pulses + 1 Squat Jump (3,2,1,Jump!) PREGNANCY TIP: omit the jump and just stand at the top.
  • Curtsy Lunges w/hip abduction (30 seconds each leg): step back with your right leg behind your left, but at an angle, bend both legs 90 degrees, as you stand to the top – release your right leg slightly out to the side then step back into the lunge and repeat.
  • Stiff-Leg Deadlifts: Keep legs almost completely straight and with a flat back, slide your hands down your legs until you back is parallel to the ground and then slide hands back to the top while keeping back flat. PREGNANCY TIP: If your belly is in the way, don’t lower down as far also keep glutes engaged to omit back tightness.
  • Low Squat Walk (stay low and step out to the right x 2 then back to the left x2 and keep repeating) PREGNANCY TIP: take breaks
  • Donkey Kicks (30-45 seconds each leg) PREGNANCY TIP: Don’t arch your back and try to keep your core engaged some
  • Side Plank w/ top leg lift (30-45 seconds each side) PREGNANCY TIP: You can keep your bottom knee on the ground for support

Home Workouts For Every Level + Tips For Working Out At Home

I have a draft post that I was going to share a few weeks ago about Baby #3 and my pregnancy fitness plan! But, with everything going on, I figured most of you would just prefer a post with content you can use. I’ll do a pregnancy workout post soon and try to get some videos up on my Instagram for all of you other expectant mamas out there!

I’m also planning to do a LIVE Bombshell Bootcamp workout this next Monday at 6pm also on my Insta for those of you that want to follow along! Since I’m super preggo – I’m having me friend and Bombshell Bootcamp Trainer Olivia demo the moves (while we stay 6 feet apart for social distancing 😉)!

I don’t know how it is where you guys are – but last week was our Spring Break and this is the first week we are actually missing school. I have a Kindergartner and pre-schooler and I’m trying to do my best with “home school”! Needless to say …..we miss our teachers!! I will plan to do a “home” schedule later this week with resources for education/learning and also kids fitness for those of you who are trying to stay sane during this time at home!

For now – I want to share some of my most popular workouts on here that are suitable for beginners up to advanced. See below for links.

Here are some of my top tips for working out at home:

  1. Put it on your schedule. I have to have a regular schedule, especially now that my kids are at home all day. It’s easy to just focus on them and then think about how exhausted I’ll be and leave out time for my workout. That’s why I schedule it first thing in the morning. I try to get it done! I’m currently doing my own workouts from my Get Fit Done Guide that I created with my friend Megan (from HoneyWereHome.com) who is a former NPC Bikini competitor (and mom of 2). Right now we have a special on our 4-week guide (it also includes a 4-week meal plan and recipes with color photos!) for only $31 AND we are donating the proceeds to the Houston Food Bank to help our local community. It’s a digital download/ebook you can save to your phone or computer (or have it printed).
  2. Keep your workouts short. You may think you need to fit in an hour because that’s how long your favorite studio class or gym session was – but at home most likely you will get interrupted or feel you can’t finish because something else has come up. Aim for 20-30 minutes and do a HIIT, TABATA or other combo workout where you are doing a mix of cardio and strength training. If you have extra time in the day – fit in another small workout or go for a walk/run/bike ride.
  3. Focus on exercises that don’t just target one muscle group. Sure – you could really get strong biceps if you work just your biceps every day, but if you do compound or combination exercises you will work more muscles at a time – thus burn more calories and fat and increase your metabolism. Examples are: squats, lunges, pushups, underhand bent-over row, planks, jumping jacks, skater lunges, etc.
  4. Pick a space that works for you. You don’t have to have an entire room or home gym – even a wall or section in your master bedroom or area in your living room works. All you really need for equipment is: a mat, 2 sets of weights (medium and heavier) and workout clothes. If you have nice weather right now, you can make a space in your garage or in your backyard!
  5. Don’t get overwhelmed with equipment. Just start with a mat and 1-2 sets of weights. Once those weights are easy for you to use you can add in a few things like a jumprope, kettlebell or more dumbbells. Here is a post I did about starting a home gym. Also, I know many sites are out of workout equipment right now – but don’t worry! You can do most of the workouts on my site using just your body weight. But, if you want to “make” some weights – get 2 gallon jugs. Fill them halfway for a medium set and full for heavy set. You can also use canned items for lighter weights and jugs of laundry detergent or bleach for medium/heavy.

Free Home Workout Links on My Blog:

  • Holiday HIIT (30 min Home Workout)
  • 15 Minute Bootcamp Workout
  • Short Beginner Workout
  • At-Home Circuit Workout + Stair Workout
  • Picnic Bench Workout
  • Kettlebell Workouts
  • The Best 30-Minute Workout
  • 20 Minute Total Body Toner
  • How To Stay Fit When You Can’t Leave The House (plus other links)
  • *You can also search the category “workouts” under “my blog” column at the top for tons of other workouts!

Comment below and let me know what you are doing to workout at home to stay on track and I’ll enter you into a drawing to win a FREE COPY of Get Fit Done!

Home Gym Starter Guide

This is the time of year that many people are still trying to commit to working out. But, where do you start? Do you join a gym, join a new HIIT or barre studio or do you try to workout at home? The answer is – any of those! Do whatever seems to motivate you the most and is the most convenient. If the gym or studio is too far from your house, you may not end up committing past January. Or, if your house is too noisy and you are distracted with other things around the house, then a home workout might not be the best for you. I personally do all 3 – I have a gym membership, I occasionally do drop-ins at local studios and then I also have a home gym for backup. Sometimes I can’t get out of the house to workout and it’s nice to have the right equipment so I can get in a mini workout whenever I want. You don’t need to devote an entire room to your “gym” but just create a space in a room (or your garage) that will work! Below are my favorite pieces of workout gear for a home gym, along with just the basics you need if you are on a budget or just starting out. All of the recommended pieces of equipment below can be found at Target, Walmart or Amazon (links below under pic).

Beginner Equipment

What you should get: 2 sets of dumbbells (1 light and 1 medium/heavy), a mat, a foam roller and a resistance band with handles. These basics should get you through a few months of workouts. The weights should be a light set and a medium set for you. The medium should be a set that you can lift (say for bicep curls) for 12-15 reps with good form. The mat doesn’t have to be fancy – just a good quality one that you can use to do core exercises and exercises on your back. If you have hardwood floors or you are planning to do your workouts in your garage, you may need a thicker mat. Resistance bands are great to change things up and can be used for things like lateral leg raises and even seated rows. The foam roller is great for post-workout soreness!

Intermediate/Advanced Equipment

What you should get: Multiple sets of weights on a weight rack; a resistance band with handles and 2 loop bands; 2 sizes of kettlebells, 1 jumprope, 1 mat and 1 adjustable bench. Once you are working out regularly. You should invest in a few different sizes of dumbbells. Why? It’s good to challenge your body sometimes with heavy weights and fewer reps and then other days do lighter weights with heavy weights. Also, as you get more advanced you will need heavier weights especially for lower body exercises like squats. Another option is to add in a barbell with different sized weight plates to adjust, but I prefer dumbbells. I would get an additional resistance band with handle (a heavier one) as well as 2 loop bands to use during hip bridges, squats and lateral moves like side shuffles. Kettlebells are great because you can use them for strength training and also for “cardio” (kettlebell swings). A bench is also great to use for step-ups, chest presses, box jumps, etc. I like the “old school” steps that you can adjust with risers. The higher the step, the more challenging it is.

1) Dumbbells 2) Mat 3) Resistance Bands 4) Foam Roller 5) Jumprope 6) Kettlebells 7) Loop Band 8) Weight Stack 9) Adjustable Bench

Beginner Workout For The New Year

This morning I was on Houston’s FOX 26 Morning Show to talk about fitness tips and workouts for beginners. Tomorrow is New Years Day and I know many of you are going to start a new workout routine – or commit to getting (or staying) fit this year, which is great! Here are some of my top tips for starting a new workout routine as well as a sample workout to try over the next few weeks. I’ll post an update with new exercises in the next couple of weeks if you’d like to follow along!

It’s true – diet is a big (if not the biggest) part of weight loss but working out is important too and it gets your body and mind set up for a healthy lifestyle and that’s what it’s all about. This should be  your new way of living and not just a temporary “diet” or weight loss plan. It starts with a healthy mindset and making small changes you can adopt for a long time.  Start by making small changes with your diet like eliminated fast food, sodas and processed foods. It’s an acquired taste but after you do it for a few weeks you won’t crave those foods and once you start to see results you won’t want to go back. For workouts- keep it simple. You don’t need a fancy gym membership, but if it motivates you to get up and workout then do it. All you need is a few simple pieces of equipment and you can workout at home. You can do a little bit each day at home and get your family involved. If they don’t want to do it with you – find some friends online or join a Facebook group or # on IG for motivation. I have a new fitness guide called Get Fit Done and we have a Facebook Group you can join to connect with others trying to get fit! I use a dry erase board on my refrigerator and plan out my workouts each Sunday. That tends to keep me on track and then I either add a big red check mark or a red X depending on if I completed it or not.

What should you do to workout when you are getting started? Aim for 30 minutes 4-5 times a week with the strength training every other day (so your body has time to recover). If you want to commit to the same time every day that’s even better. Make it a habit and part of your routine that’s non-negotiable. Do 15-20 min of “cardio” first to warm up your body (things like walking, biking, etc.). This doesn’t have to be crazy fast (don’t overdo it or you’ll burn yourself out) but you do need to break a sweat.  Then, do a little strength training. Why strength training? The more muscle you have – the more calories you burn and strong muscles prevent injuries. You may not notice those toned muscles for awhile though if you have a lot of body fat. But once it all comes together with your healthier diet then you will notice slimmer body parts with stronger, toned muscles. I always tell clients that if you just want a smaller version of yourself, focus on diet and cardio. But, if you want to change your shape and muscle tone…you have to do some strength training.

You aren’t going to see results right away. Consistency is key. Just go about it like it’s your new lifestyle and focus on how you feel after your workout (you will never regret it!) and how deep inside you are helping your heart and organs. Focus on that at first instead of the scale. Then before you know it you will notice a change in your appearance and the way your clothes fit. 

When you are starting out you want things that are simple yet you get the most bang for your buck and burn the most calories. You also don’t want to spend an hour a day or you may get overwhelmed and discouraged. I like exercises that work more than 1 body part at a time (like the ones below). Invest in 1-2 sets of weights. As you get more advanced you can do more body weight exercises but I really like weights for beginners because they make your body work harder and it’s easier to focus on your form. 

Beginner Workout

Aim for 12-15 reps of each and repeat the whole set 2-3 times (probably 2 when you are first starting out). You’ll need 1 set of medium weights, a chair, bench or couch (that won’t move) and a mat or grass.

Chair squat to shoulder press: Start in front of a sturdy chair, bench or couch. Keep feet about hip-distance apart and bend your knees like you are about to sit in the chair. Hold your weights at your shoulders. Then, as you straighten your legs to stand, press your arms overhead for a shoulder press. Keep most of the weight in your heels and don’t let you knees shift forward past your toes.

Knee push-up: Start on a mat, carpet or grass and come down to your knees. Walk your hands out slightly wider than your shoulders (or the edge of your mat). Keep a flat back and as you bend your elbows, lower your chest down so your elbows and shoulders are level. Exhale and press yourself back to the top. Make sure your hips don’t stick up but that also you don’t arch your back (keep your back flat).

Bent over row to kickback: Grab 2 weights and then bend your knees and then with a flat back, bend over until your back is almost parallel with the floor. Straighten your arms and let them hang down then while keeping your elbows close to your sides, pinch your elbows up behind you and squeeze your shoulder blades together. Then, when you are at the top part of that exercise, do a tricep kickback (kick your weights back and straighten your arms). Then, reverse the process coming back to the top of the row and then extend the arms down by your legs.

Wall sit with bicep curl: This is a great one if you have knee injuries. Find a flat sturdy wall and place your back up against it. Slowly bend your knees and lower yourself down like you are “sitting” with your knees over your ankles (make sure you can see your toes). Hold this position for 30 seconds or more (work up to it). If you want to make it harder you can hold 2 weights and do bicep curls while sitting.

Plank: I like forearm planks because they work your shoulders and core. Come down to your mat and make sure your elbows are right under your shoulders. Lift your knees up and make sure you have a nice flat back. Press your heels back towards your mat. Hold as long as you can and build up to 60 seconds. It’s normal to shake – your body is working hard!

After 2 weeks, change up these exercises a little (I will post another beginner routine here on my blog). Also, if your weights start to get to easy (you feel you could do 20+ reps) swap them for slightly heavier. Or start with your heaviest set and complete as many reps as you can with good form, then swap them for lighter weights right after to finish the set (12-15 reps total).

You may be sore the first few weeks and that’s normal. Stretch a little after each workout when you are warm. It’s ok to workout when you are a little sore. Don’t use that excuse not to do your next workout. It can help with soreness.

Next →

Primary Sidebar

Connect

Featured Posts

Get Fit Done |A Healthy Lifestyle Guide

Summer Workout Series

How To Get Rid of Shin Splints and IT Band Tightness

Featured Posts

Old-School Bodybuilding Chest Workout – Featured in Oxygen Magazine

Family Travel Review – Margaritaville Lake Conroe

Weighted HIIT Workout Featured in Oxygen Magazine

Categories

  • Free Sample Workouts
  • Nutrition
  • Fit Travel
  • Yoga
  • Beauty
  • Lifestyle


Loading Comments...